If there’s one thing that makes the difference between selling fast or not selling at all on Vinted, it’s not the price… or even the product. It’s the photos.
You can have a great item, a competitive price, and a solid description — but if the image doesn’t grab attention, the user won’t even click on your listing. And if they don’t click, there’s no sale. At that point you’ll inevitably find yourself thinking: how is it possible this item isn’t selling? And that leads to real frustration.
In this complete guide you’ll learn to value this aspect of Vinted and discover how to take photos for Vinted that truly convert visits into purchases — even if you have no experience or professional equipment.
The results will surprise you, I’m sure of it.
The reality: on Vinted, you buy with your eyes
When a user browses Vinted, they make decisions in a matter of seconds. They scroll, see an image, and decide whether to click or keep scrolling. That first visual impact is what determines everything.
So your goal is not just to “take a photo” — it’s to create an image that stands out among dozens of similar products. Keep in mind that your item will generally not be the only one of its kind listed on the app, so standing out from the rest is key.
If your photo doesn’t capture attention, the rest of the listing doesn’t matter — regardless of what you’re selling.
Lighting: the factor that influences your sales the most
If I had to choose just one element that instantly improves your photos, it would be light. Try taking photos from different angles and positions, and you’ll quickly realize that each photo makes the item look like a completely different product.
Bad lighting can make an item look old, dirty, or unattractive — even if it’s in perfect condition.
Good lighting, on the other hand, conveys quality, cleanliness, and trust.
The ideal is to use natural light, near a window, avoiding harsh shadows.
You don’t need spotlights or expensive equipment. In fact, many of the best photos on Vinted are taken with a phone and good light — no need to overcomplicate it (if you become more professional later, you can invest in an advanced lighting setup).
Simple rule: if the photo looks dark or yellowish, retake it until you get a clean image that truly represents the product.
The background: less is more
Another key point for your photos: the background.
A cluttered background is distracting, reduces professionalism, and takes the spotlight away from the product. We need to be careful and thoughtfully choose the “spot” where we’re going to show the item.
The best option is to use simple backgrounds:
- White wall
- Clean floor
- Neutral sheet
This makes the item stand out and conveys a much more professional feel.
Remember you’re competing with other sellers. If your photo looks cleaner and clearer, you have an advantage.
A great identity marker for your profile is always using the same backgrounds (choosing one or another depending on the tone of the item you’re showing). This way, your photos will become recognizable to buyers over time.
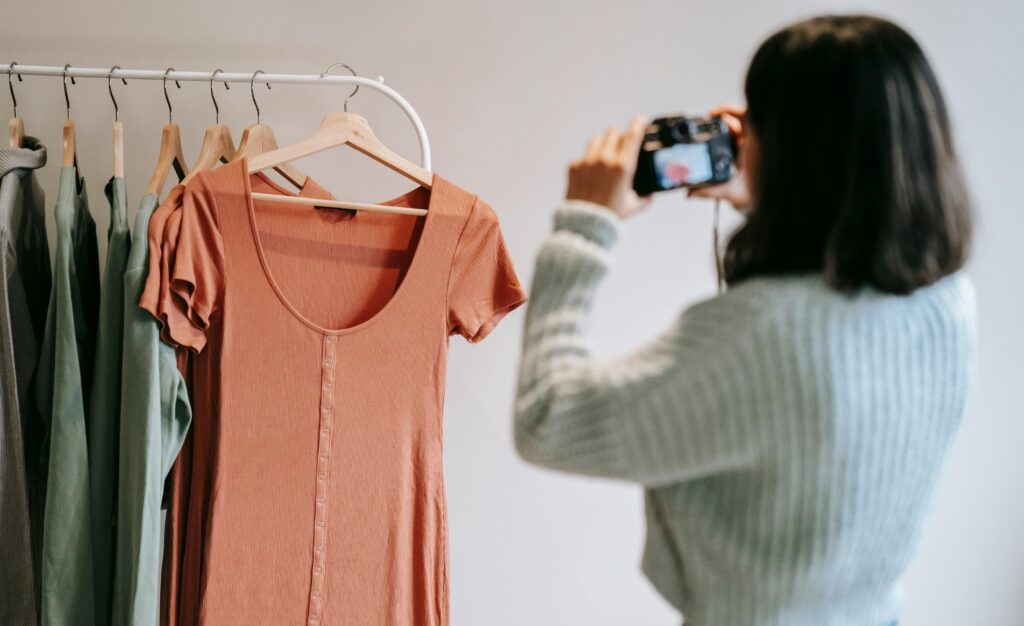
How to position clothing so it looks its best
The way you present the item matters much more than it seems.
You have several options:
- Hang it on a hanger
- Lay it flat on a surface
- Show it being worn (if possible)
The important thing is that it looks clear, wrinkle-free, and well arranged.
A creased t-shirt can look lower quality even if it isn’t.
Small details = more sales
It also depends on the type of item you’re photographing, since positioning a shirt is not the same as positioning a pair of trousers. Think about what would be most visually appealing to you as a Vinted user.
Showing details: builds trust and reduces doubts
One of the most common mistakes is uploading just one general photo.
This creates doubts in the buyer’s mind, since you’re not showing all the important aspects of your product. Sometimes a small detail can make the difference between selling or not selling.
To build trust, it’s important to add several images showing:
- Labels
- Texture
- Stitching
- Any possible defects
The more visual information the buyer has, the fewer questions they’ll have… and the higher the chances of a purchase.
The main photo: your most important weapon
Of all the images, there’s one that changes everything:
The first photo.
It’s the one that appears in the feed and decides whether someone clicks on your product or not. So we need to make sure it’s the best possible showcase of our item.
It should be:
- Clear
- Well lit
- Centered
- Attractive
If this photo doesn’t work, nothing else matters — you won’t get buyers interested enough to click on your listing.
Consistency: looking like a shop, not a casual seller
Here’s one of the most underrated points.
If all your photos follow the same style (same light, same background, same presentation), your profile will look much more professional.
As I mentioned earlier, this creates a profile identity, builds trust, and improves your conversion rates.
You go from looking like someone selling random items… to looking like a shop.
And that completely changes how buyers perceive you.
You go from making occasional small sales to dominating different sections within the app.
Real example: how to improve an average photo
Imagine this situation:
Photo taken in a dimly lit room, cluttered background, and wrinkled item
- Result: few views, few sales
Now the same product:
Photo with natural light, clean background, and item well arranged
- Result: more clicks, more interest, more sales
It’s the same product. Only the presentation changes — and the sales result changes with it.
Mistakes that are holding back your sales
Many sellers simply don’t sell because of basic photo mistakes.
Some of the most common are:
- Dark or poor quality photos
- Cluttered backgrounds
- Too few images of the product
- Not showing details
- Blurry images
These mistakes create distrust and make buyers move on to the next product.
Very importantly — once you have all your images and descriptions ready to upload, do a quick general review to make sure you’re not making these mistakes.
Do you need a good camera?
No, and this is important. Nowadays, any smartphone has more than enough quality to take great photos — though obviously some are better than others. For example, iPhone is widely recognized for its professional photography capabilities.
What makes the difference is not the camera, but:
- The light
- The framing
- The background
- The presentation
Technique > equipment
How many photos to upload per product
Another key point.
Uploading just one or two photos significantly limits your sales.
The recommendation is to add several images showing the product from different angles.
This not only improves trust, but also increases the time the user spends on your listing — and that helps sell more.
Make sure you have as many photos as needed so that no detail of the item goes unnoticed by buyers.
Conclusion: sell more without changing the product
Many people think they need better products to sell more.
But the reality is that most of the time they just need better photos.
If you apply what you’ve learned here, you can increase your sales without spending money and without changing what you sell.
Right now you have an advantage over most sellers, because almost no one pays attention to this aspect.
Other guides: “How to make money on Vinted without buying.” “What to sell on Vinted to make money.”